Cabinet
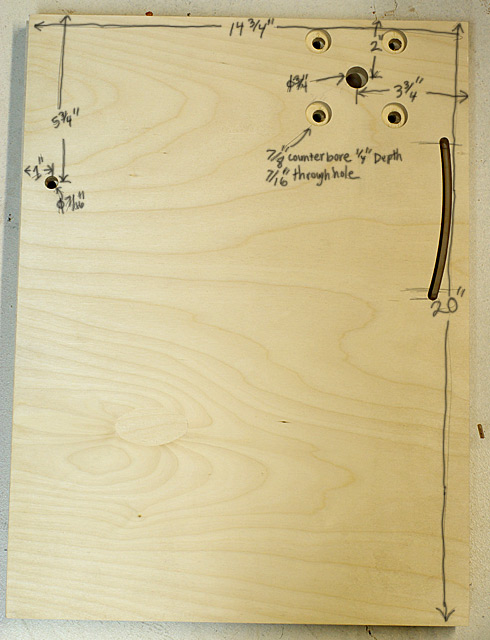 |
The cabinet is fairly simple, built from 3/4" baltic birch. The sides are 14-3/4" x 20" and the front and back are 22-1/2" x 8" and 12", respectively. The front and back get a rabbet on their sides. The bottom is 22-1/2" by the assembled width of the sides (easier to cut it to fit than make your two rabbets assemble to match a particular dimension) and gets a rabbet on all sides. The sides get a 7/16" hole for the pivot bushing and a 3/4" hole for the drum axle. The exact locations of the holes is not critical, but they must be perfectly aligned on the two sides so take the time to set up stops at the drill press. There are also counterbored holes matching the bolt pattern of the bearings, and (not shown) slots to the axle holes to allow the drum to be installed/removed after the cabinet is assembled. |
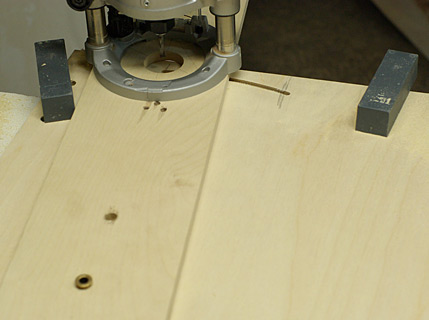 |
The sides also need a curved slot for the table lock knobs. This is done with a router and circle jig. I drilled a 7/16" hole at 13" radius and used the bushing as the pivot point. You should enlarge the hole in the jig slightly or you'll have lots of fun getting the bushing out when you're done. I just used a pair of clamps to act as stops, as well as hold the stock. The exact start and stop points aren't important, just be a bit generous. I started with a 1/4" spiral upcut, making several passes, and then switched to the approximately 5/16" bit from my dovetail jig. I am using 1/4-20 hardware for the lock knobs, and you want the slot to have some play so it's not binding and possibly cause the table to tilt. If you don't have a 5/16" bit or are using 5/16-18 hardware 3/8" is fine. I use a fender washer under the lock knobs so it doesn't really matter. |
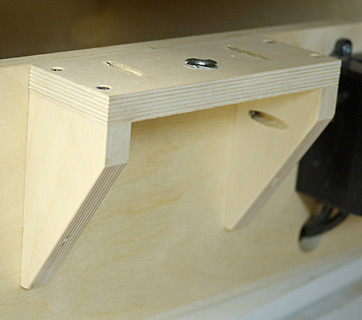 |
I did this part later, but if you don't have a pocket hole jig you'll want to install the plate for the height adjuster before assembling the cabinet. The plate is 8"x3" with a hole for a t-nut 1-3/4" from the edge that meets the cabinet. |
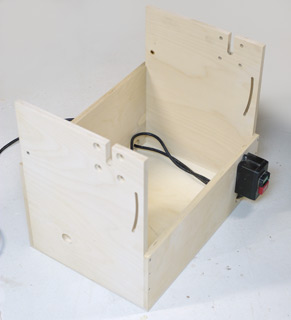 |
You'll also want to make holes for the motor arbor and your electrical wiring. Easier to deal with large holes at the drill press before assembly. I am using a ready-made switch from Rockler that comes with a two foot cord with a female plug, I wired the motor with a short cord but you could cut the female plug off and wire it directly. The assembly of the cabinet should be pretty straightforward. The rabbets make it easy to assemble everything square. |