|
Design
|
|
I really did not want to have to build this myself, but I could not find a commercial product that was what I wanted or anyone to build to my specs. The main design inspirations for this come from the Byrnes Model Machines Thickness Sander and another modeler's homebrew machine, Art Herrick.
My original specifications were as follows:
- 11"x2.75" diameter drum
- use regular sheet sandpaper
- 1/2-3/4 hp motor
- portable, under 50 lbs
The drum was originally sized to fit a standard sheet of paper with enough overlap for clamping. However that went out the window when I decided to make use of some 3" diameter MDF half-round that I had available. This meant the sheet had to wrap in the other direction, so the 11" length was up for discussion as well. The pre-keyed shafting came in multiples of 6" length, and 12" would be too short when you factor in the width of the bearings and pulley. So I got the 18" length shaft, laid out the pulley and bearings and ended up with a 14" length.
I contacted Grizzly to find out the weights of their 1/2 and 3/4 hp motors, they gave me shipping weights of 28 and 31 lbs, respectively. Given the small price difference between the two and that I had lengthened the drum I decided it was worth the extra 3 lbs.
| 3/4 hp motor | $100 |
| 3/4" pillow block bearings | $40 |
| A Size Pulleys | $30 |
| link belt | $20 |
| 18" keyed shaft | $25 |
| Switch | $25 |
| misc hardware | $50 |
| Total: | $290 |
Ouch...
|
The Drum
|
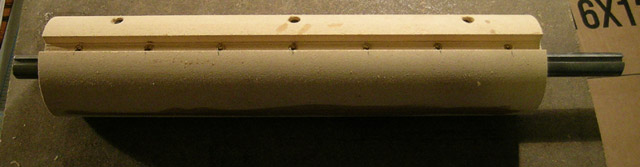
 | |
The drum began as 3" diameter MDF half-round from Rockler. I ran a core box bit down the center of each side for the shaft on the router table, dialing in the fence setting with each pass. It ended up pretty darn close, limited as much by the straightness and tolerances of the blank itself as the fence setup. Because I only had a 3/4" core box bit I ended up with a larger shaft than really necessary which will add to the weight, but I didn't think it was worth buying another bit just for this.
To create the wedge shaped groove to hold the sandpaper I whipped up a quick upside-down U-shaped sled and hot glued the blank to it. I set the table saw blade to 10 degrees, which seemed to look right. Hopefully it'll work. You can't see from the pictures but I ran this groove on both sides for balance. I installed threaded inserts for #6 screws (from McMaster-Carr) on 2" centers for attaching the wedge. I started out with 1/4-20 hardware because I had the inserts already, but the heads of the machine screws were just too large, the wedge would have had to be much larger than I thought was proper.
Adding in the keyway is pretty straightforward. The two halves are held together with 6 countersunk screws and epoxy. Sure hope I didn't forget anything, because that sucker is never coming apart. |
|
|
The Frame
|
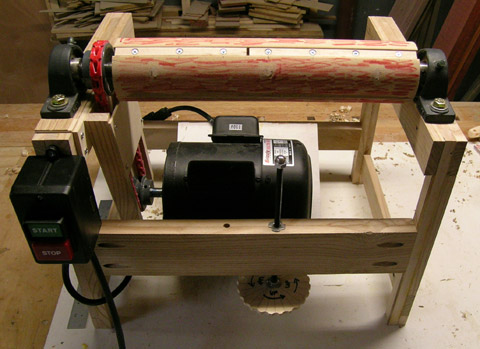 | |
Front View The frame is pretty simple, made from oak pallet wood that was about 1/2 inch thick. Since I felt I had a good handle on the height and length the side frames needed to be I began there. I just doubled and tripled up the wood, and used lap joints. What I didn't have a good handle on was the positioning of the front and rear cross pieces. Not that I wanted to do any fancy jointery anyway, I used pocket screws which gave a lot of strength as well as allowing disassembly and repositioning. Also note that I put the drive pulley on the inside of the bearing and frame. This is due to the keystock being a press fit on the shaft and the bearing not having a keyway. If the pulley was on the end of the shaft it would be difficult to remove the shaft from the bearing. The red scribbles on the drum are so I can tell when the drum has been properly trued round and even with the table later on. |
|
 | |
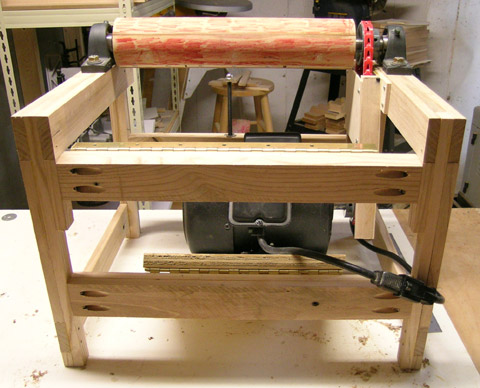
Side View Note that the top of the upper rear cross piece is beveled to allow the table to tilt up. I began with this cross piece higher such that the table was level when it touched the drum and only tilted down. I found that the angle was too severe with the table all the way down, and it seemed to make more sense to have the table tilting down from the operator for most operations so that pieces don't slide back into the drum and exit at high velocity. It's now set to be level at about 1" thickness. The motor mounts to the lower rear rail with the leftover piano hinge as I saw in other designs. This probably works just find for 1/4 hp motors, but the 3/4 hp motor I used is just too heavy. The belt is under more tension than needed, and the end opposite the pulley sags moving the pulleys out of alignment and the motor bounces during operation. I stuck a shim under the motor to take up the weight and now it purrs. |
|
 | |
Rear View The switch I got from Rockler is rated for 15 amps and has a 2 ft cord with a female plug. You could cut the plug off and wire it directly to the motor, but as I had a cord available that I'd been saving for just such a use (and amazingly was able to find it when I needed it) I preserved the plug in case I ever repurpose that switch. Note that I had to reverse the motor to run counter-clockwise. If your motor is not reversible be sure to pay attention to which side the pulley needs to be facing so that the bottom of the sanding drum is moving towards the operator, unless your intention is to build a missile launcher not a drum sander. |
|
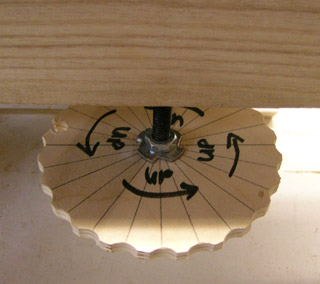 | |
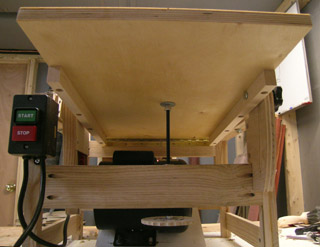
Height Adjuster I happened to have a scrap circle of ply with radial lines. I put finger holds around the edge with a 1/2 inch drum on the spindle sander. It's attached to the threaded rod with a t-nut and another nut tightened against it. I added the directional arrows as my brain just can't grasp that upside-down means turn it the other way. Most of the designs I saw had some sort of locking mechanism on the threaded rod, presumably to keep it from moving due to vibration of the machine. When I ran the machine without a table the rod did start spinning, but with the table on it doesn't seem to move, I'll keep my eye on it as I begin using the machine. So, for the time being there is just a t-nut in the front crosspiece and a slightly oversize through-hole. |
|
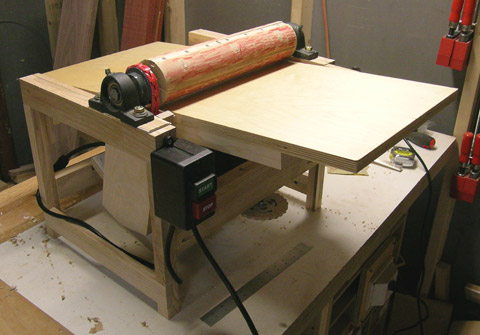 | |
Table From the beginning I had misgivings about the design of the height adjuster in regards to keeping the table parallel to the drum under load. Once I got the table attached with the piano hinge at the rear (not a fun task) I was finally able to test this and my suspicions were confirmed. Very little pressure with one finger at the edge of the table just in front of the drum produced a noticeable deflection of the table. My first step to try to correct this was to add two jointed strips of maple 3/4 by 1 inch to the edges of the 3/4 inch plywood as a stiffener, and a point of attachment for the next step if that wasn't enough, which it wasn't. Note that I shellaced the plywood table top and bottom before installing it. I may never get around to finishing the frame, but that needed to get done. |
|
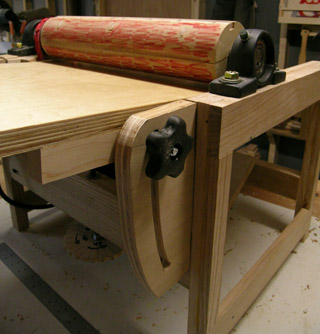 | |
My fix for keeping the table from rocking is this knob on the right side. I added a piece of ply to the frame and held a pencil the table to trace the arc of its swing. I then cut out the arc on the scroll saw. Normally I'd do something like that with a router jig, but given the circumstances and not needing it to be pretty I just cut it out. There is a t-bolt that runs through a hole in the maple board under the table, and a couple of washers to take up the space between the table and frame extension. If I knew this was going to be necessary from the beginning I would have made the front post on this side wider to accomodate this. With the knob locked down that side is rock solid, and it takes a lot of force to get any deflection on the opposite side. It does pull the table toward the side, torquing the piano hinge which then creaks when moved again as it tries to align itself again. |
|
 | |
The end of the threaded rod is capped with a cap nut (McMaster-Carr calls this an acorn nut) and there is a fender washer on the underside of the table to keep the nut from digging into the plywood. Thanks to Art Herrick's page referenced above for this idea. For the time being I am leaving this washer loose, just captured by the weight of the table. This is because as the table pivots the washer would move in relation to the threaded rod. This way it will self-center. If it makes a habit of falling off I'll have to glue it on. The threaded rod is 5/16-18, which I used because that was the largest I could get at my normal woodworking sources. At the time I was operating under the delusion I wouldn't need to order anything from anywhere like McMaster-Carr. It doesn't seem to be a problem, but I'd go with at least 3/8ths if I had it to do over. |
|
|
|
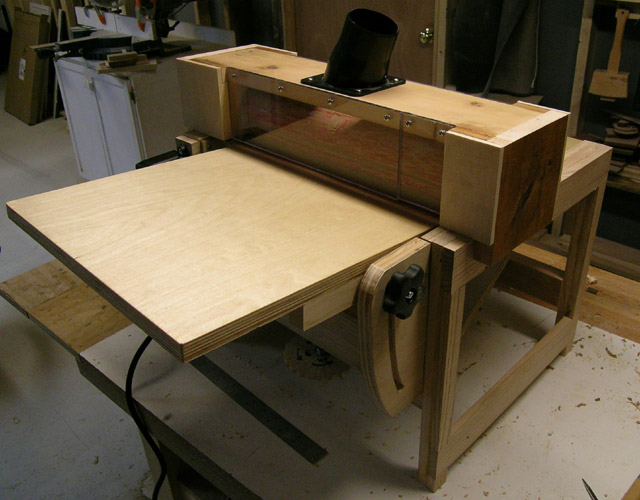
The safety shield / dust shroud is not going to win any beauty contests, it was pretty much slapped together, but it should do the job. Not really visible in the photo is a separator on the inside that guards the pulley, assuring that any board that might end up at angle doesn't find its way into the belt. There's a seam in the lexan because I was originally planning on an 11" long drum, and 12" lexan was readily available. The whole assembly just drops right over the pillow blocks and seems to have enough mass to stay put.
|
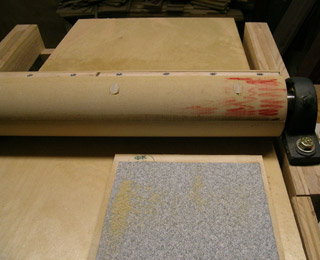 | |
Truing the Drum Once you have everything ready the drum needs to be made perfectly round and parallel to the table. Shim the pillow blocks until you get the drum as parallel as you can manage. Then afix a piece of sandpaper to a flat surface, bring the table up close and sand the drum until all the marks on the drum are gone. What you see in the picture is what happens when you forget to unlock the table lock knob and take so much off one side you have to shim it up again. I did that just for illustrative purposes, of course. Once the drum is trued be sure to ease the edges of the grooves to allow the sandpaper to slide over them easily and not have a high spot. |
|
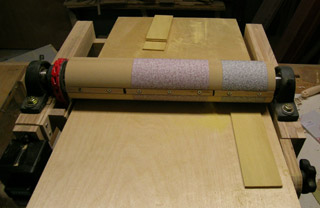 | |
Making Sawdust The attachment of the sandpaper seems to work pretty well. When the wedge is tightened you can see and feel the paper getting pulled tight. It ends up so tight in fact when I went to remove the paper the wedge had to be pried out with a screwdriver. It seems to be a one shot deal with the paper though, once you take it off the crease prevents it from tightening up properly if you try to reuse it. |
|